USTRUCT(BlueprintType)
struct COMMONUI_API FCommonInputActionDataBase : public FTableRowBase
{
GENERATED_BODY()
FCommonInputActionDataBase();
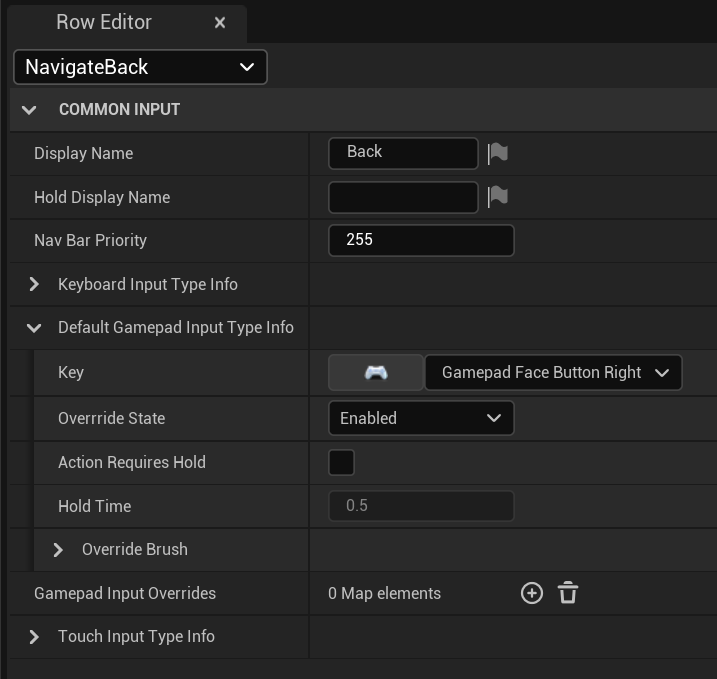
/** User facing name (used when NOT a hold action) */
UPROPERTY(EditAnywhere, BlueprintReadOnly, Category = "CommonInput")
FText DisplayName;
/** User facing name used when it IS a hold action */
UPROPERTY(EditAnywhere, BlueprintReadOnly, Category = "CommonInput")
FText HoldDisplayName;
/** Priority in nav-bar */
UPROPERTY(EditAnywhere, BlueprintReadOnly, Category = "CommonInput")
int32 NavBarPriority = 0;
protected:
/**
* Key to bind to for each input method
*/
UPROPERTY(EditAnywhere, Category = "CommonInput")
FCommonInputTypeInfo KeyboardInputTypeInfo;
/**
* Default input state for gamepads
*/
UPROPERTY(EditAnywhere, Category = "CommonInput")
FCommonInputTypeInfo DefaultGamepadInputTypeInfo;
/**
* Override the input state for each input method
*/
UPROPERTY(EditAnywhere, Category = "CommonInput", Meta = (GetOptions = "CommonInput.CommonInputBaseControllerData.GetRegisteredGamepads"))
TMap<FName, FCommonInputTypeInfo> GamepadInputOverrides;
/**
* Override the displayed brush for each input method
*/
UPROPERTY(EditAnywhere, Category = "CommonInput")
FCommonInputTypeInfo TouchInputTypeInfo;
};
DisplayName
해당 InputAction의 이름
Navigation Bar가 있는 경우 해당 Bar에 표시된다.
HoldDisplayName
버튼 Hold 동작이 필요한 InputAction의 이름
NavBarPriority
Navibation Bar Action을 왼쪽에서 오른쪽으로 Sort할 때 사용하는 Priority
USTRUCT(BlueprintType)
struct COMMONUI_API FCommonInputTypeInfo
{
	GENERATED_USTRUCT_BODY()

	FCommonInputTypeInfo();
private:
	/** Key this action is bound to	*/
	UPROPERTY(EditAnywhere, Category = "CommonInput")
	FKey Key;
public:

	/** Get the input type key bound to this input type, with a potential override */
	FKey GetKey() const;

	/** Get the input type key bound to this input type, with a potential override */
	void SetKey(FKey InKey)
	{
		Key = InKey;
	};

	/** EInputActionState::Enabled means that the state isn't overriden and the games dynamic control will work */
	UPROPERTY(EditAnywhere, Category = "CommonInput")
	EInputActionState OverrrideState;

	/** Enables hold time if true */
	UPROPERTY(EditAnywhere, Category = "CommonInput")
	bool bActionRequiresHold;

	/** The hold time in seconds */
	UPROPERTY(EditAnywhere, Category = "CommonInput", meta = (EditCondition = "bActionRequiresHold", ClampMin = "0.0", UIMin = "0.0"))
	float HoldTime;

	/**
	*	Time (in seconds) for hold progress to go from 1.0 (completed) to 0.0.
	*	If the hold interaction was interrupted, then hold progress starts to roll back decreasing its value.
	*	Set to 0.0 to disable the rollback functionality.
	*/
	UPROPERTY(EditAnywhere, Category = "CommonInput", meta = (EditCondition = "bActionRequiresHold", ClampMin = "0", UIMin = "0", ClampMax = "10.0", UIMax = "10"))
	float HoldRollbackTime;

	/** Override the brush specified by the Key Display Data  */
	UPROPERTY(EditAnywhere, Category = "CommonInput")
	FSlateBrush OverrideBrush;
};
UENUM(BlueprintType)
enum class EInputActionState : uint8
{
	/** Enabled, will call all callbacks */
	Enabled,
	/** Disabled, will call all the disabled callback if specified otherwise do nothing */
	Disabled,

	/** The common input reflector will not visualize this but still calls all callbacks. NOTE: Use this sparingly */
	Hidden,

	/** Hidden and disabled behaves as if it were never added with no callbacks being called */
	HiddenAndDisabled,
};
Enabled
Input이 활성화 되어 있음
Callback이 호출 됨
Disabled
Disable Callback이 선언되어 있는 경우 이를 호출 함
그 외의 모든 Callback이 반응하지 않음
Hidden
Reflector가 시각적으로 보이지는 않지만 Callback이 호출 됨.
자주 사용하지 않을 것을 권장 함.
HiddenAndDisabled
Reflector가 시각적으로 보이지 않고, Callback도 동작하지 않음.
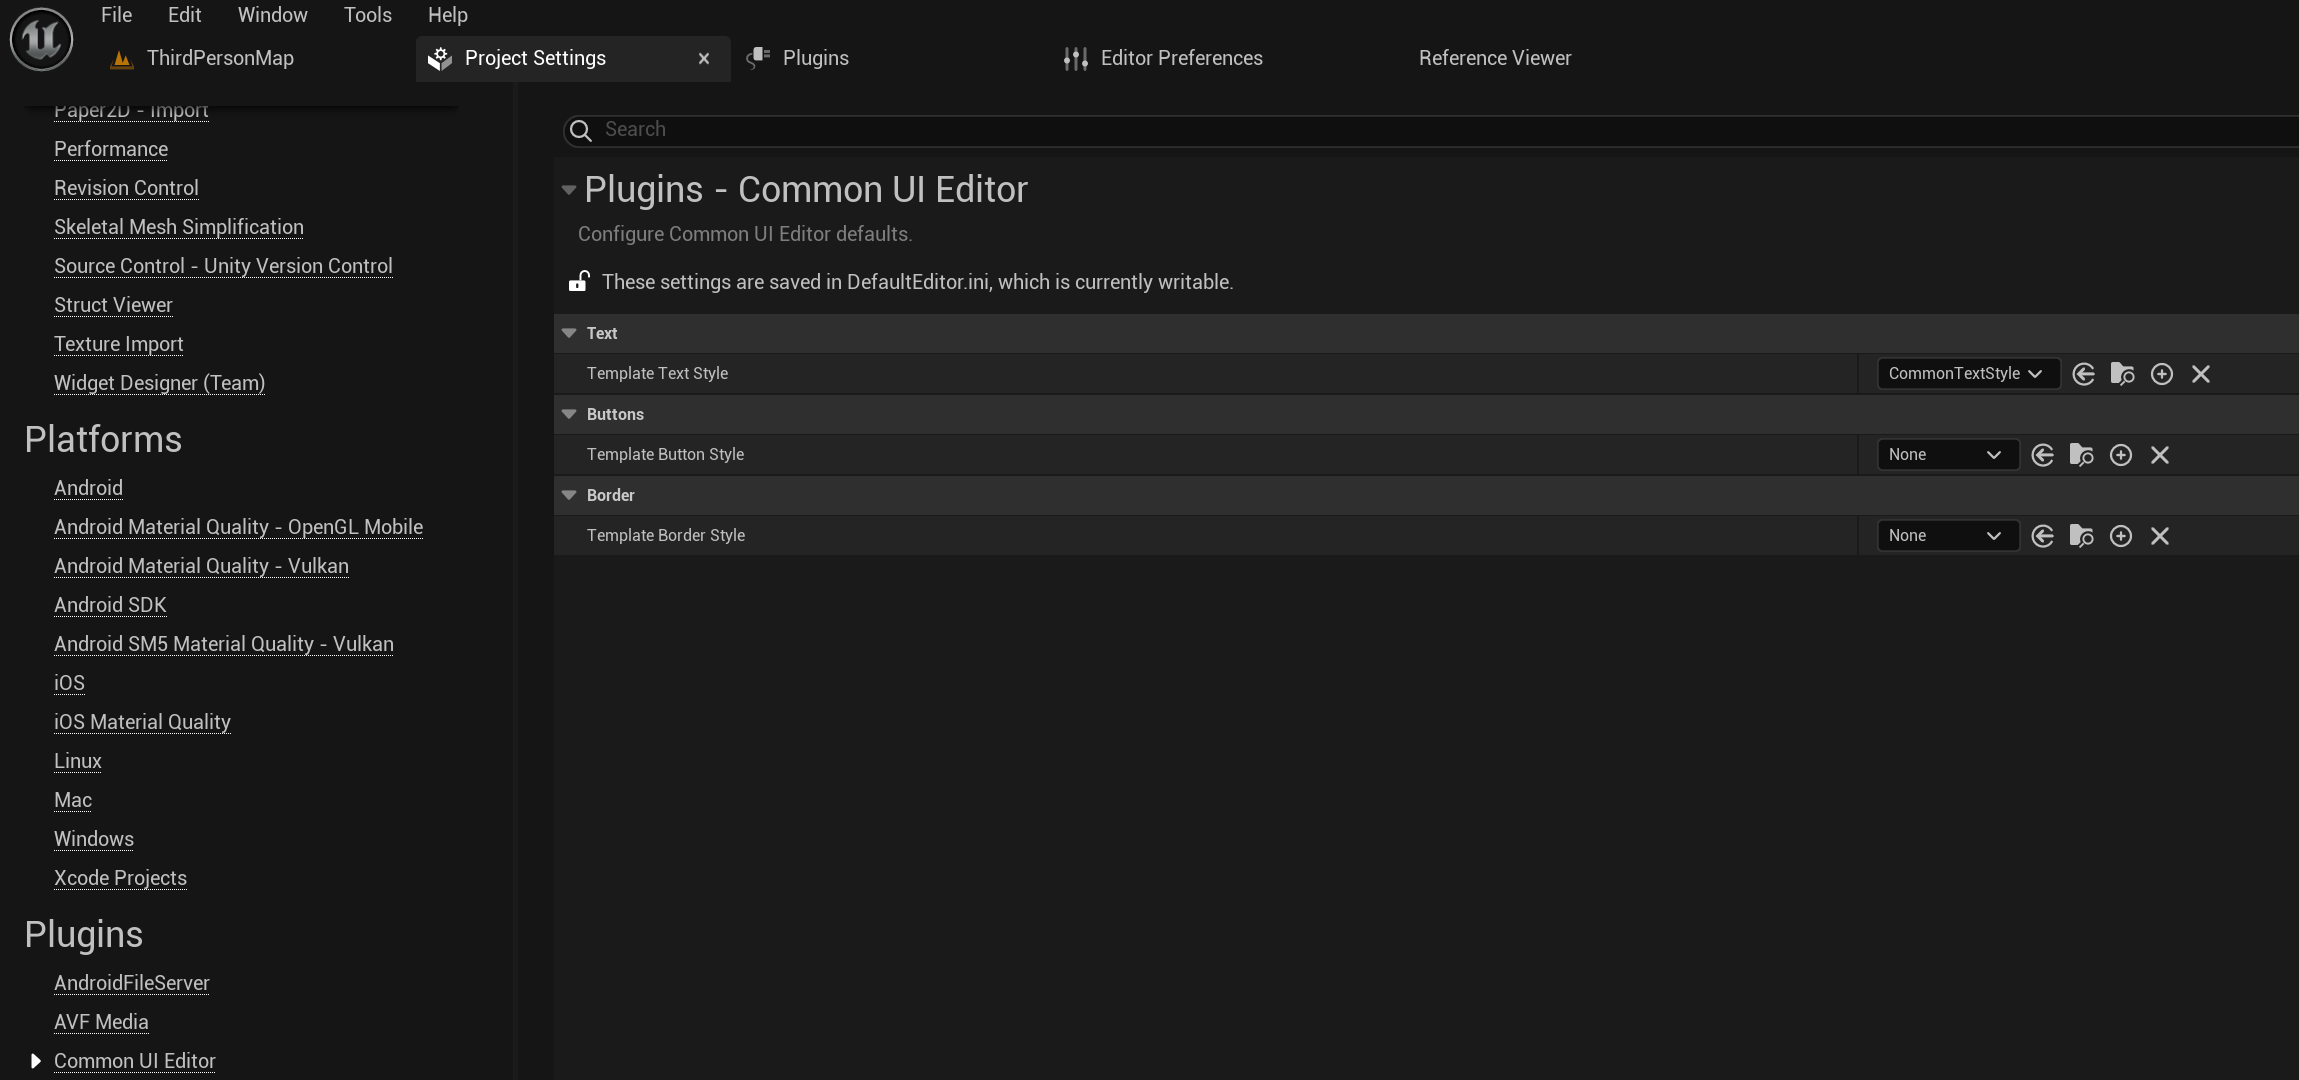
Default Navigation Action Configure
Unreal Engine에서 Native Navigation을 지원하지만, CommonUI을 사용하면 CommonUIInputData를 기반으로 한 별도의 Navigation이 정의되어야 한다.
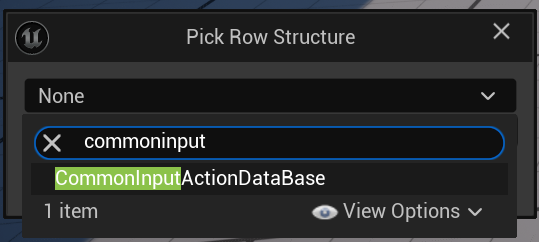
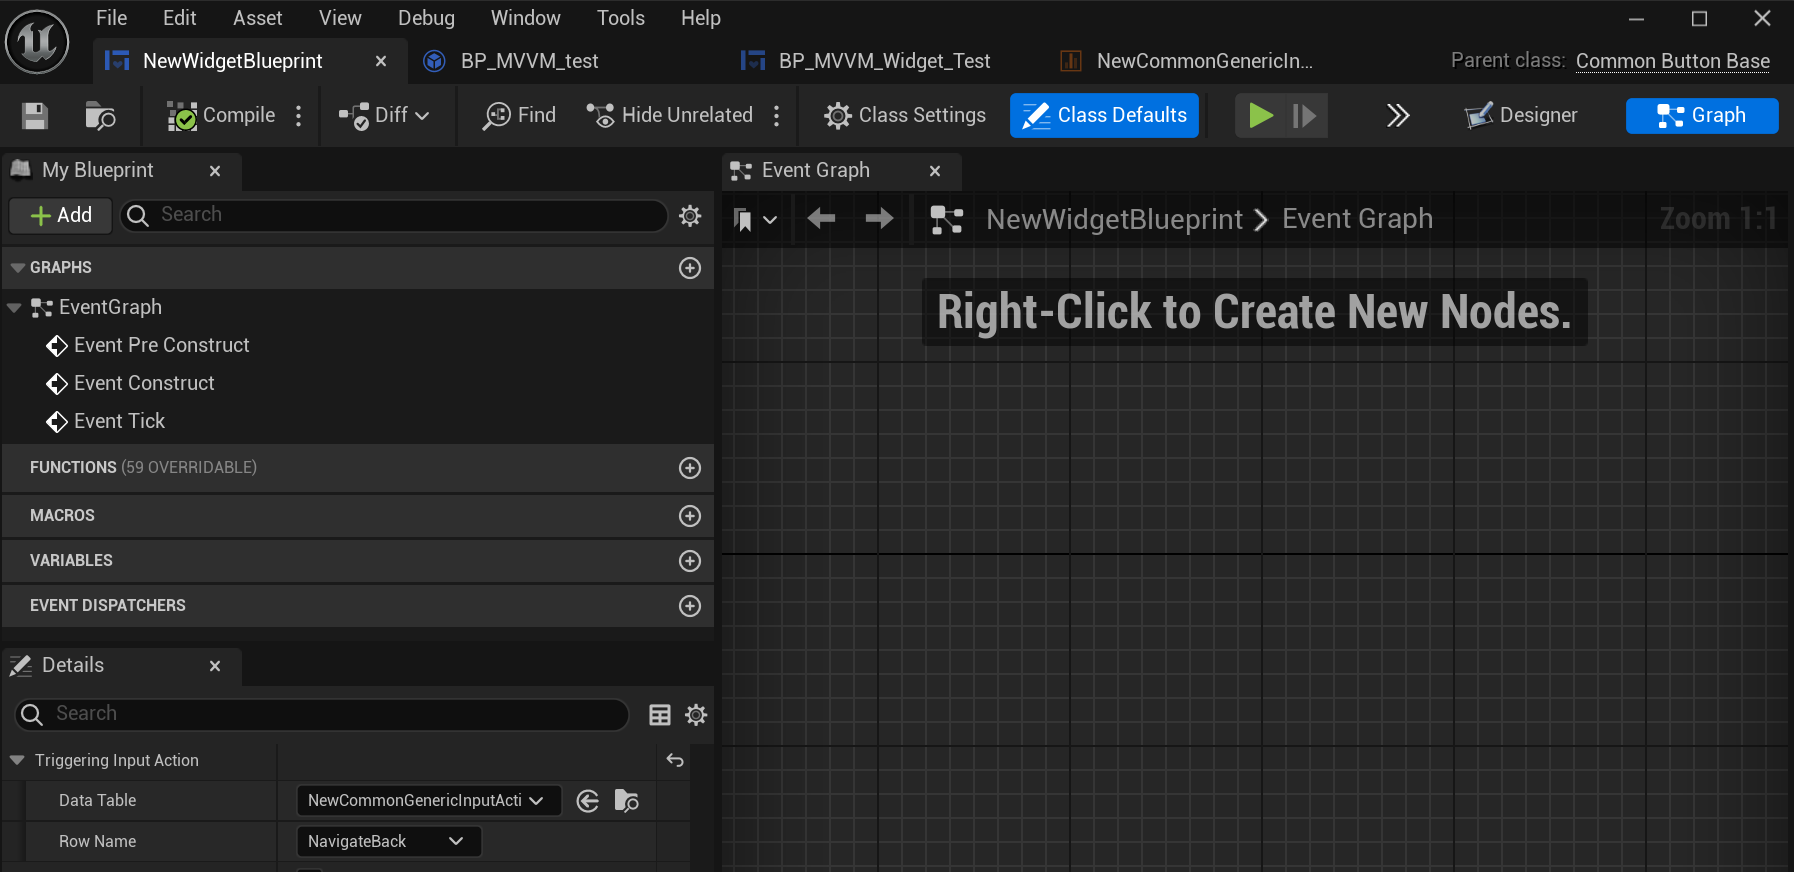
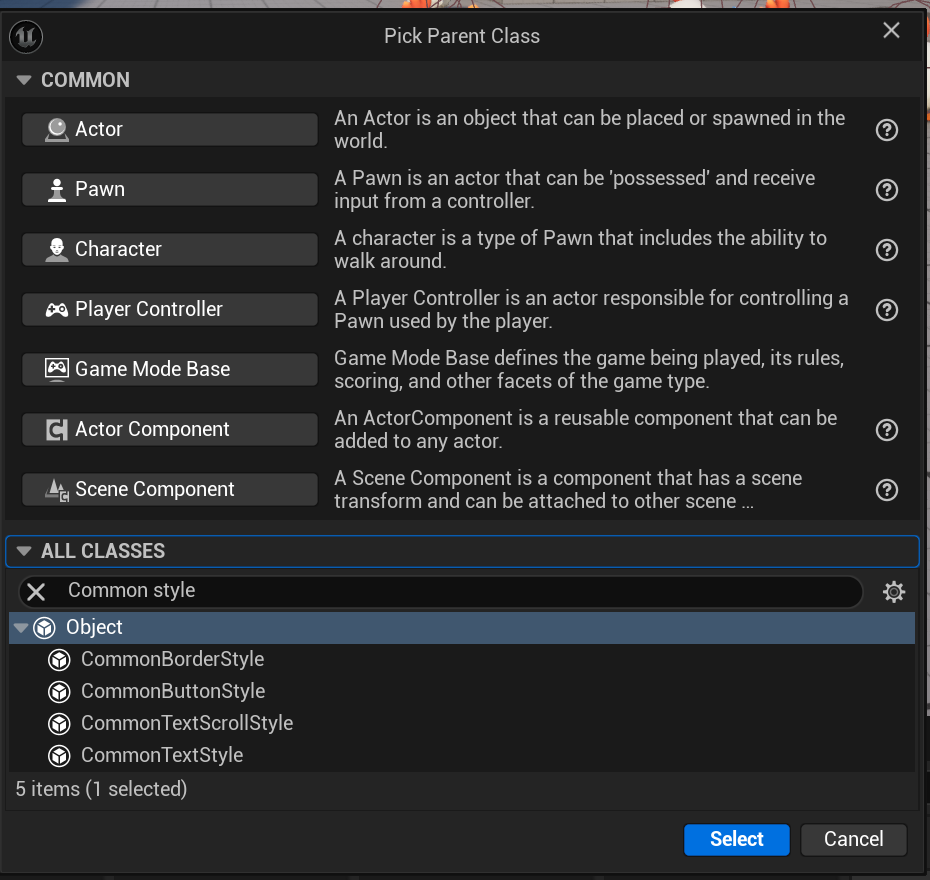
Create New Plueprint Class에서 CommonUIInputData를 선택해 BP 생성
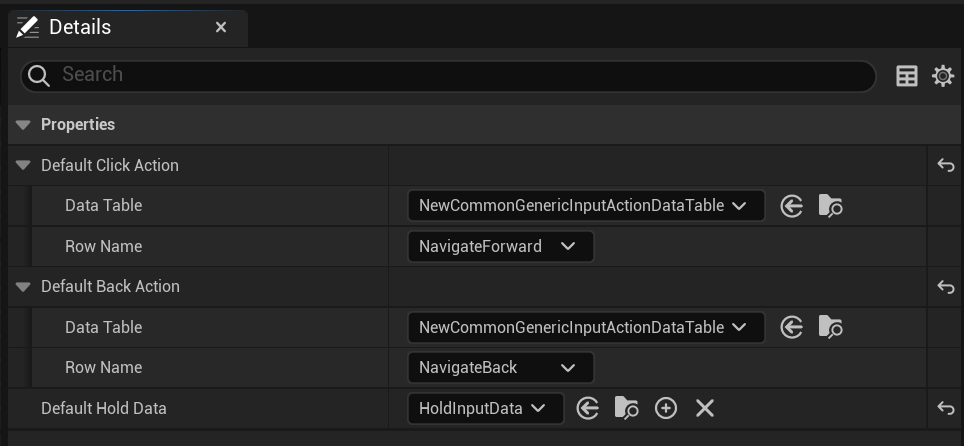
생성한 파일 내에 CommonUI InputActionDataTable과 Row를 지정하여 Navigation을 지정
HoldData의 경우 CommonUIHoldInputData를 기반으로 신규 BP를 생성한 뒤, 해당 파일을 연결해줘야 한다.
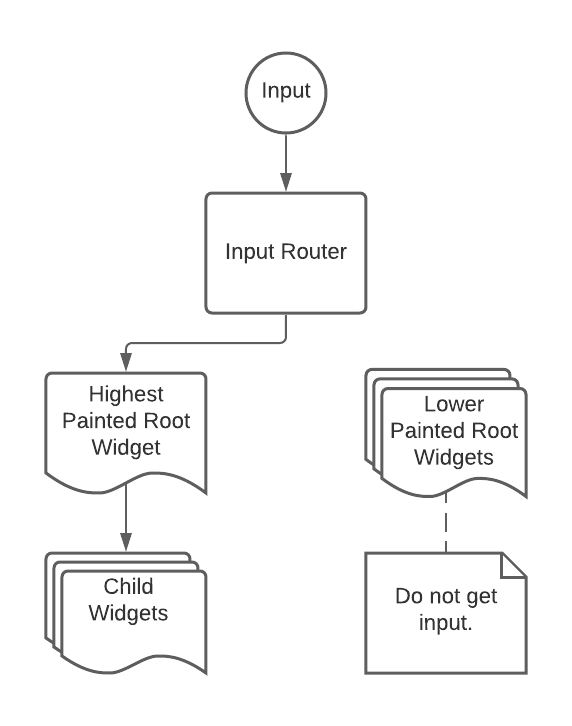
Click Action
버튼이나 기타 상호작용 가능한 Element를 Highlight 할 때 Mouse Click을 대체
Back Action
현재 Menu에서 이전 Menu로 이동할 때 공통으로 사용
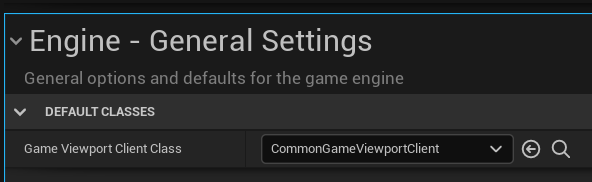
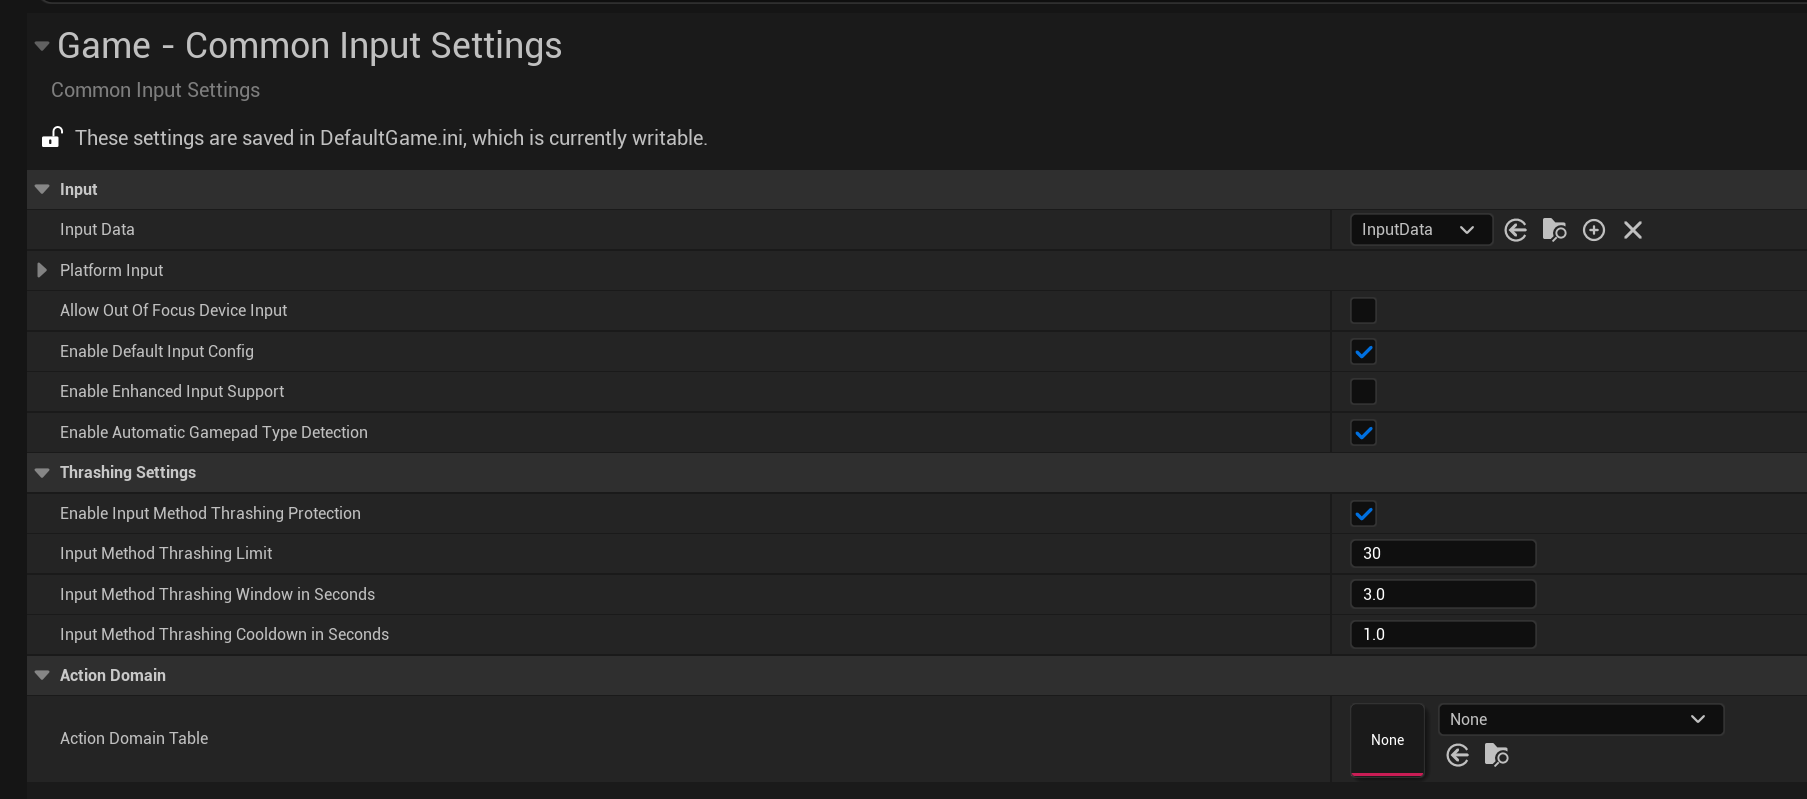
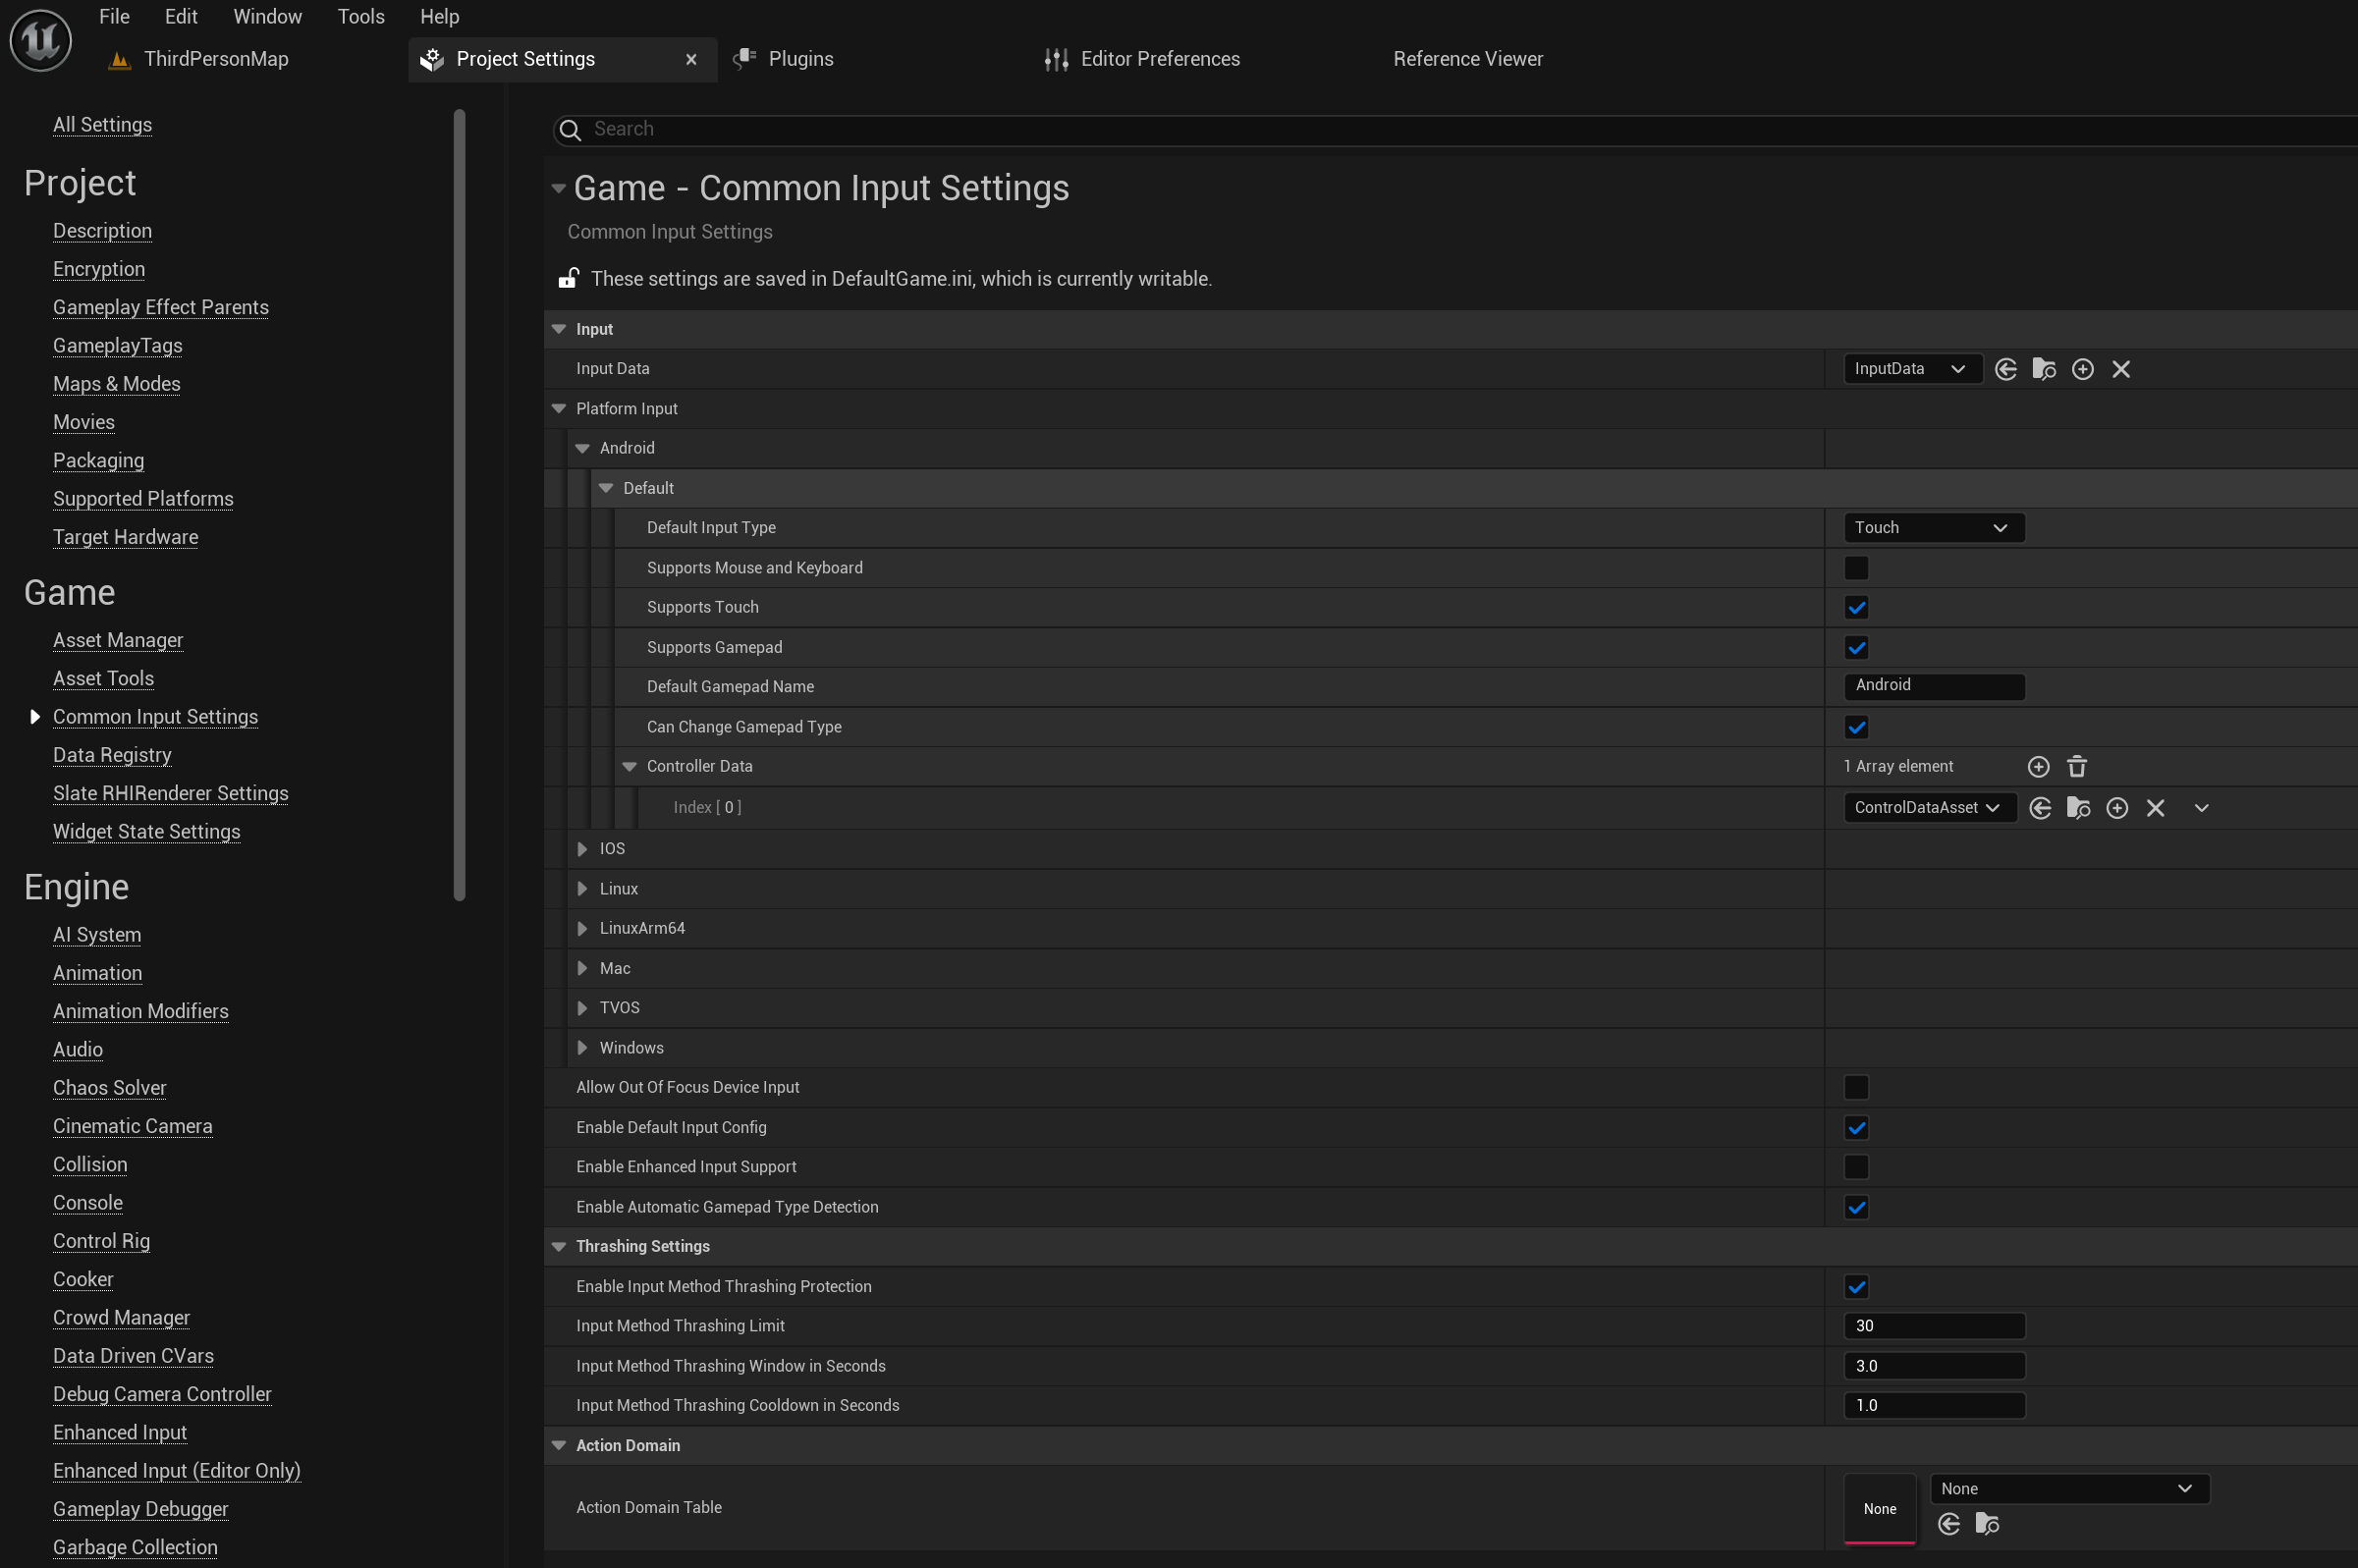
Project Settings -> Game -> Common Input Settings의 InputData에 연결한다.
설정 시, 지정된 Asset을 Default Navigation에 사용한다.
Bind Controller Data per Platform
Controller Data Asset은 Key-Action을 UI Elemnt에 연결해준다.
각 Controller Data Asset은 Input Type, Gamepad, Platform과 연관되어 있다.
CommonUI는 이 정보를 이용해 현재 Platform과 Input Type을 기반으로 올바른 Platform 별 UI Element를 자동으로 사용한다.
이를 통해 다수의 Input Type이나 고유한 Gamepad를 지원하는 Platform에서 User Input을 올바른 GamePad에 전달하거나, Runtime에서 UI Elemnt를 교체할 수도 있다.
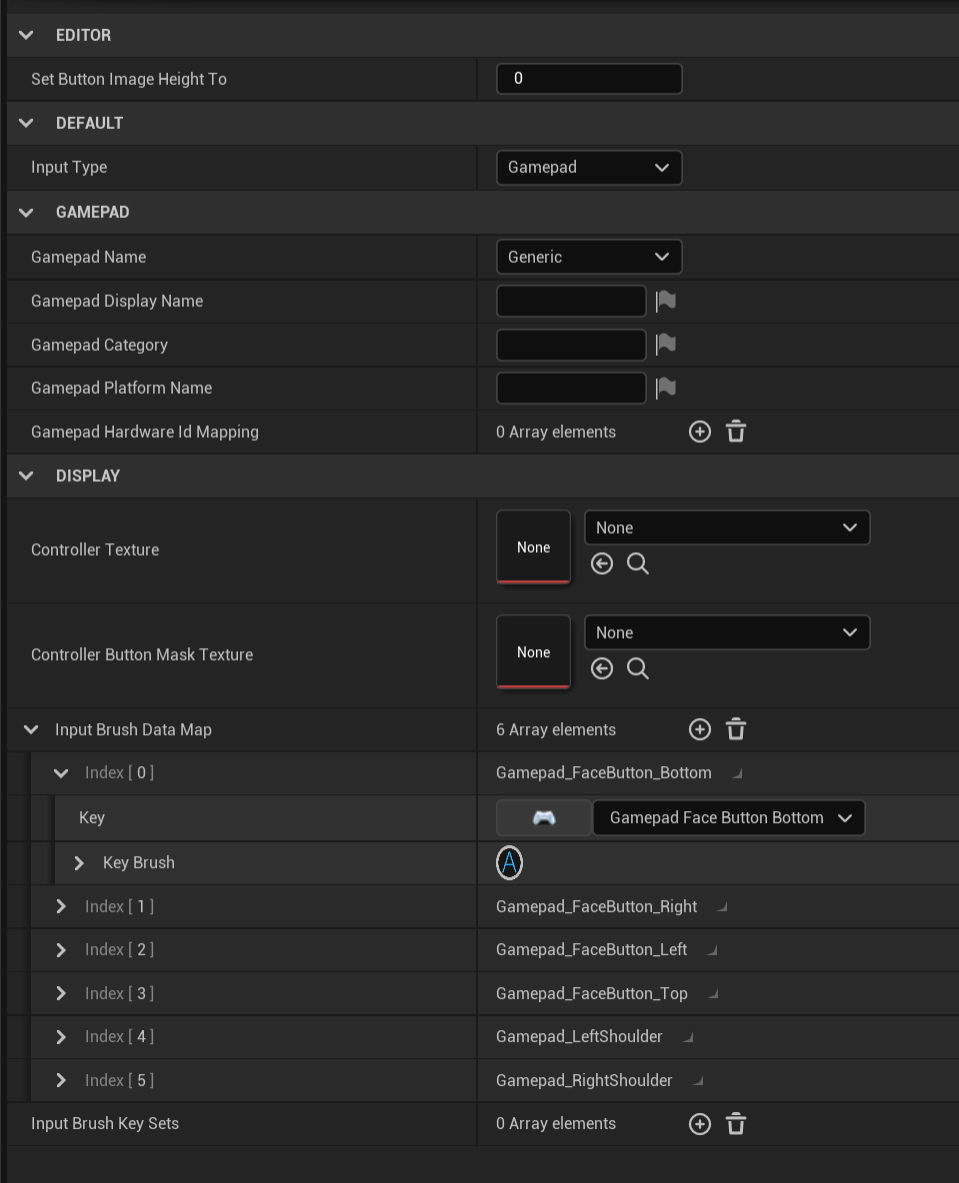
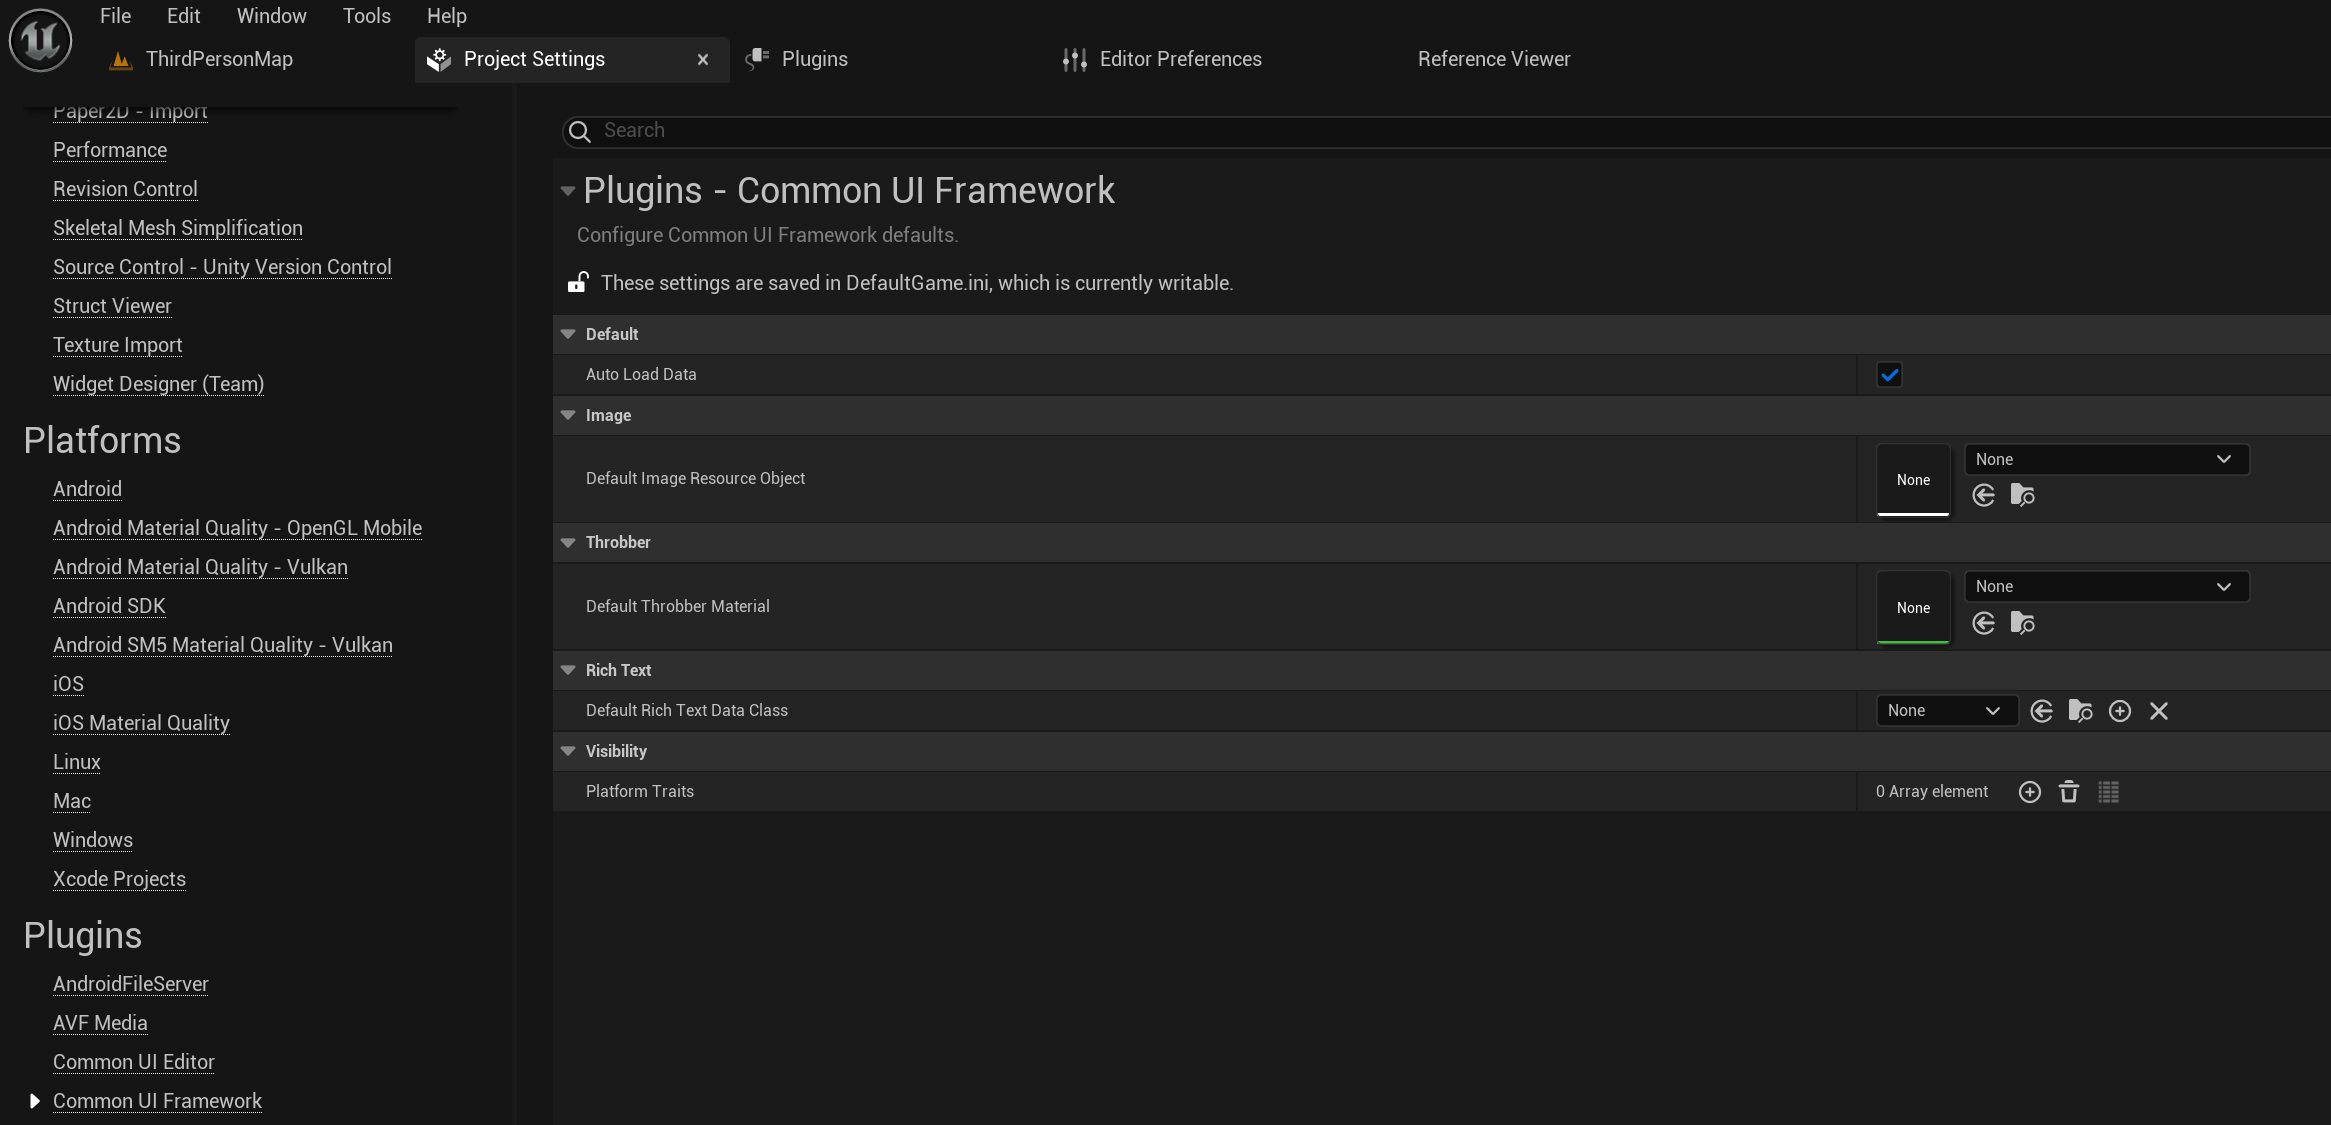
Create New Blueprint Class에서 CommonInputBaseControllerData를 선택해 생성
생성한 모든 Controller Data Asset은 Project Settings -> Game -> Common Input Settings의 Platform Input에 추가되어야 한다.
Platform Input에서 입력하는 Default Gamepad Name은 Controller Data Asset들의 Gamepad Name 필드들로만 입력되어야 한다.
이 값이 일치하지 않으면 Controller Data를 인식하지 못하고 Icon이 표시되지 않는다.
보통은 한 Platform의 Controller Data Array에 여러 개의 Gamepad Data를 작성해 다양한 컨트롤러를 지원한다.
만약 별도의 Controller에 대한 게임플레이 지원을 해야 한다면, Gamepad Data를 새로 작성해 Controller Data에 추가하면 된다.
이는 변수 값이 수정 될 때 등록된 Widget만 업데이트 하기 때문에 Attribute Bind보다 훨씬 효과적이다.
동시에 시간 설정을 수동으로 구현 할 필요도 없어 Event Driven UI Framework의 이점을 살리기 좋다.
Config
View Model
역할
UI에 필요한 변수의 Manifest 관리
UI와 Application의 기타 요소간 Communication을 위한 매개체
UI가 변수를 인지해야 하는 경우
ViewModel에 변수 추가
Widget에 ViewModel 추가
Widget의 Field를 ViewModel에 Bind
변수를 업데이트 해야 하는 경우
ViewModel의 Reference를 가지고 있다면 언제든 직접 접근하여 수정
변경 된 변수에 Bind된 Widget을 Notify하고 업데이트
ViewModel in BP
Creation
Content Borwser를 우클릭하여 New Blueprint를 통해 ViewMode BP 생성
ViewModel은 Widget이 아니기 때문에 User Interface에 없고 일반 BP 생성 방식을 통해야 한다.
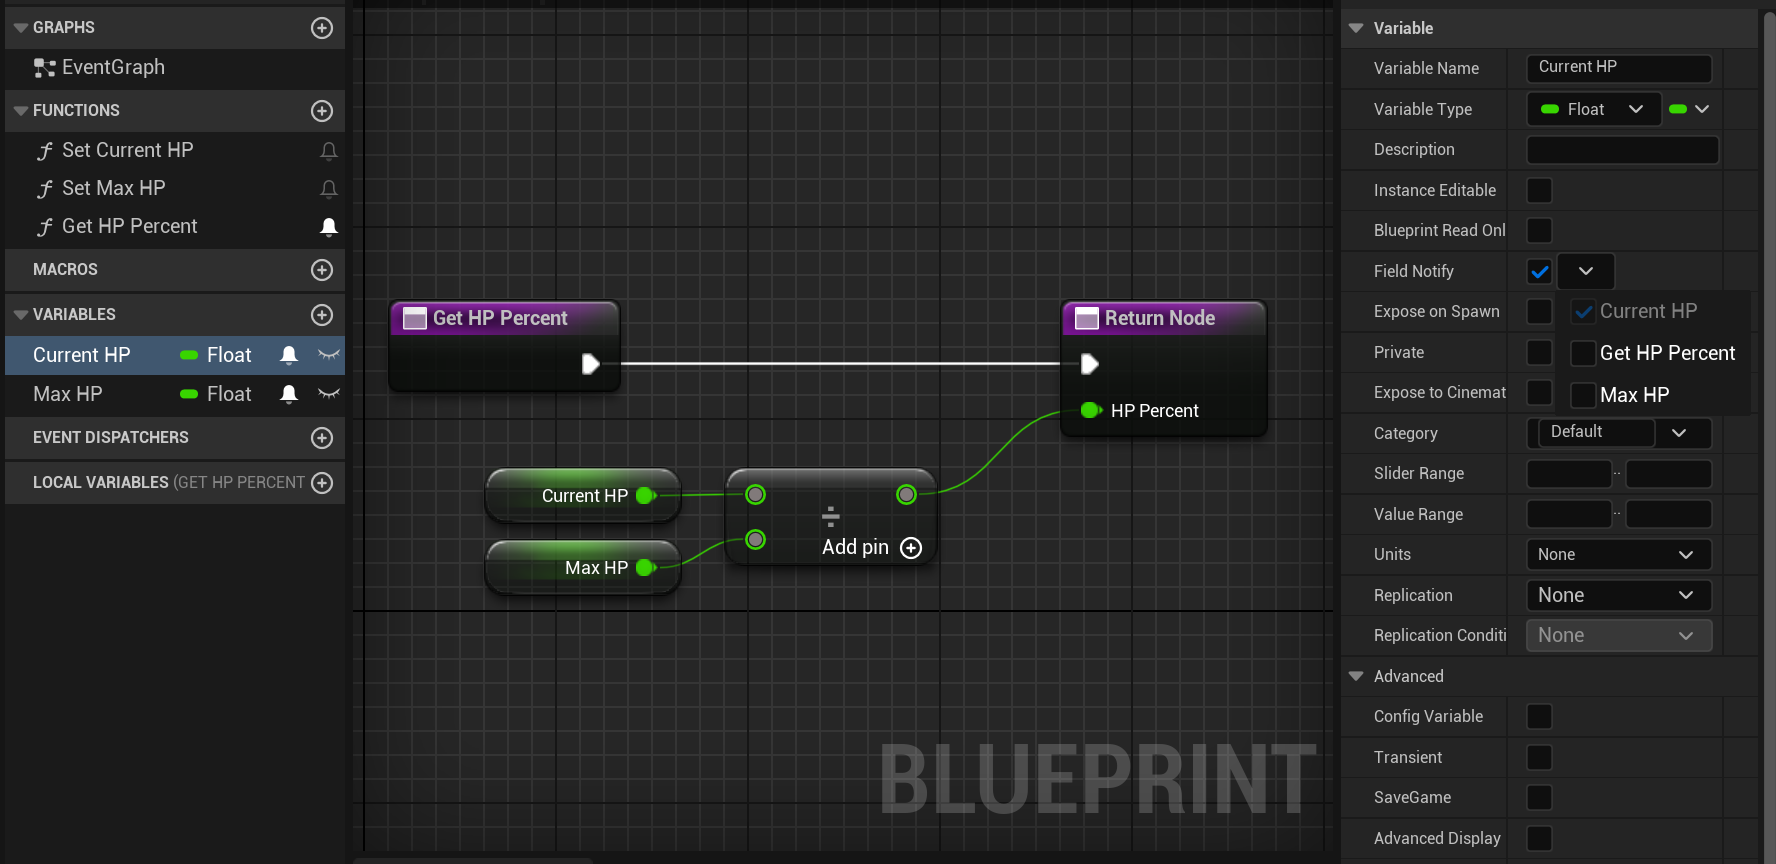
FieldNotify Variable
BP의 변수 옆에 종 모양 UI가 FieldNotify 활성화 여부이다.
FieldNotify가 활성화 된 변수의 Set은 BP 라벨의 이름이 Set w/ Broadcast로 지정된다.
위와 같이 설정 된 변수들은 값이 변경될 때마다 Bind된 Widget에 Update 메시지를 전송한다.
FieldNotify Function
Function 역시 FieldNotify로 취급 될 수 있으나 변수에 비해 몇 가지 조건을 요구한다.
Pure Function일 것
Const 마킹이 되어 있을 것
하나의 값만 반환할 것
Input Parameter가 없을 것
FieldNotify를 사용한다면 가급적 값을 반환하는 목적만 있는 Getter 생성은 지양해야 한다.
차후에 Widget을 Bind하려 할 때 추가되는 Getter 함수와 햇갈릴 수 있다.
Bind FieldNotify to Another FieldNotify
변수인 CurrentHP, MaxHP 뿐 아니라 Function인 GetHPPercent까지 FieldNotify 항목에 추가됨을 확인할 수 있따.
만약 FieldNotify 변수가 변경 되는 경우, 그 변수에 FieldNotify Function을 Bind 해줘야 한다.
이는 비단 Function 뿐 아니라 FieldNotify 변수에 다른 FieldNotify 변수를 Bind할 수도 있다.
FieldNotify에 다른 FieldNotify 변수나 함수가 Bind되어 있다면, 변수가 수정될 때 Bind 된 함수의 실행은 물론 Bind된 변수에 Bind 된 Widget에까지 Update가 된다.
ViewModel in C++
Creation
#pragma once

#include "CoreMinimal.h"
#include "MVVMViewModelBase.h"
#include "MyMVVMViewModelBase.generated.h"

UCLASS()
class MYTEST_API UMyMVVMViewModelBase : public UMVVMViewModelBase
{
	GENERATED_BODY()

};
기본적인 ViewModel은 UMVVMViewModelBase를 상속 받아 생성할 수 있다.
class INotifyFieldValueChanged : public IInterface
{
	GENERATED_BODY()

public:
	// using "not checked" user policy (means race detection is disabled) because this delegate is stored in a container and causes its reallocation
	// from inside delegate's execution. This is incompatible with race detection that needs to access the delegate instance after its execution
	using FFieldValueChangedDelegate = TDelegate<void(UObject*, UE::FieldNotification::FFieldId), FNotThreadSafeNotCheckedDelegateUserPolicy>;

public:
	/** Add a delegate that will be notified when the FieldId is value changed. */
	virtual FDelegateHandle AddFieldValueChangedDelegate(UE::FieldNotification::FFieldId InFieldId, FFieldValueChangedDelegate InNewDelegate) = 0;

	/** Remove a delegate that was added. */
	virtual bool RemoveFieldValueChangedDelegate(UE::FieldNotification::FFieldId InFieldId, FDelegateHandle InHandle) = 0;

	/** Remove all the delegate that are bound to the specified UserObject. */
	virtual int32 RemoveAllFieldValueChangedDelegates(const void* InUserObject) = 0;

	/** Remove all the delegate that are bound to the specified Field and UserObject. */
	virtual int32 RemoveAllFieldValueChangedDelegates(UE::FieldNotification::FFieldId InFieldId, const void* InUserObject) = 0;

	/** @returns the list of all the field that can notify when their value changes. */
	virtual const UE::FieldNotification::IClassDescriptor& GetFieldNotificationDescriptor() const = 0;

	/** Broadcast to the registered delegate that the FieldId value changed. */
	virtual void BroadcastFieldValueChanged(UE::FieldNotification::FFieldId InFieldId) = 0;
};
하지만 이보다 더 근본적으로, INotifyFieldValueChanged만을 Implement 하여 생성할 수도 있다.
/** Base class for MVVM viewmodel. */
UCLASS(Blueprintable, Abstract, DisplayName="MVVM Base Viewmodel")
class MODELVIEWVIEWMODEL_API UMVVMViewModelBase : public UObject, public INotifyFieldValueChanged
{
	GENERATED_BODY()

public:
	//~ Begin INotifyFieldValueChanged Interface
	virtual FDelegateHandle AddFieldValueChangedDelegate(UE::FieldNotification::FFieldId InFieldId, FFieldValueChangedDelegate InNewDelegate) override final;
	virtual bool RemoveFieldValueChangedDelegate(UE::FieldNotification::FFieldId InFieldId, FDelegateHandle InHandle) override final;
	virtual int32 RemoveAllFieldValueChangedDelegates(const void* InUserObject) override final;
	virtual int32 RemoveAllFieldValueChangedDelegates(UE::FieldNotification::FFieldId InFieldId, const void* InUserObject) override final;
	virtual const UE::FieldNotification::IClassDescriptor& GetFieldNotificationDescriptor() const override;
	virtual void BroadcastFieldValueChanged(UE::FieldNotification::FFieldId InFieldId) override;
	//~ End INotifyFieldValueChanged Interface

/*etc*/
};
FieldNotify 변수를 선언하려면 UPROPERTY에서 다음 지정자들을 지정해야 한다.
FieldNotify를 선언하지 않은 경우 Onetime, 즉 변수가 최초로 변경될 때에만 Notify가 발생하고 그 이후에는 발생하지 않는다.
Setter와 Getter는 필요에 따라 추가한다.
단, 추가하지 않으면 해당 동작에 대한 연산은 해당 Class는 물론 하위 Class에서도 수행할 수 없다.
Getter/Setter은 Bind 된 Function 실행이나 FieldNotify Update 외에 변수값을 얻기 전에 연산을 해야 하는 경우에도 적절하다.
Getter/Setter함수는 UFUNCTION으로 생성할 경우 BP에서 상당히 많은 목록을 생성하기에 이를 지양하는 것이 좋다.
UPROPERTY에서 이미 FieldNotify의 Get/Set에 연결을 해준 상태다.
Unreal Engine은 FiendNotify 변수에 대한 Getter/Setter 함수 호출을 강제하지 않는다.
사용자 귀책 실수를 줄이고 싶다면 접근제어자를 조절하는 것이 필요하다.
BP에서는 FieldNotify 변수가 변경될 때 Bind된 FieldNotify 변수나 함수가 자동으로 Update되지만. C++로 작업한다면 이들을 직접 호출해줘야 한다.
FieldNotify Function
FieldNotify Function은 다음 조건을 만족해야 한다.
UFUNCTION에서 BlueprintPure, FieldNotify 지정자 선언
Parameter가 없어야 함
const 선언이 되어 있어야 함
out 인자 없이 단일 값을 반환해야 함.
Widget이 특정 변수에 Bind 되어 있으면서 동시에 값을 직접 사용하지 않고 연산을 거쳐야 하는 경우에 유용하다.
일종의 임시 변수 생성
FieldNotify Macro
/** After a field value changed. Broadcast the event. */
#define UE_MVVM_BROADCAST_FIELD_VALUE_CHANGED(MemberName) \
	BroadcastFieldValueChanged(ThisClass::FFieldNotificationClassDescriptor::MemberName)

/** If the property value changed then set the new value and notify. */
#define UE_MVVM_SET_PROPERTY_VALUE(MemberName, NewValue) \
	SetPropertyValue(MemberName, NewValue, ThisClass::FFieldNotificationClassDescriptor::MemberName)

/** Use this version to set property values that can't be captured as a function arguments (i.e. bitfields). */
#define UE_MVVM_SET_PROPERTY_VALUE_INLINE(MemberName, NewValue) \
	[this, InNewValue = (NewValue)]() { if (MemberName == InNewValue) { return false; } MemberName = InNewValue; BroadcastFieldValueChanged(ThisClass::FFieldNotificationClassDescriptor::MemberName); return true; }()
Add ViewModel to Widget
Widget을 생성하고 Window->Viewmodels항목을 선택하면 다음 창이 뜬다.
해당 창에서 미리 만든 ViewModel을 선택하면 된다.
ViewModel은 여러 개 등록 할 수 있다.
그 말은 Widget과 ViewModel의 관계는 1:1이 아니라 다:다라는 의미이다.
Initialize ViewModel
ViewModel을 처음 추가하면 위와 같은 Noti를 볼 수 있다.
이는 현재 Widget에서 등록된 ViewModel에 Bind가 없기에 굳이 Initialize를 하지 않겠다는 의미이다.
View Binding에서 Bind를 추가해주면 관계가 생성되며 자동으로 Instance가 생성된다.
Create Instance
Widget Instance 별로 각각 새로운 ViewModel Instance를 자동 생성
동일한 Widget이 Viewport 상 여러 개 존재하더라도 하나의 변수를 수정하면 그 ViewModel에 해당하는 Widget만 Update 된다.
이와 동일하게, 여러 개의 서로 다른 Widget을 생성할 때에도 다른 Widget의 정보 변경을 인지하지 못한다.
C++의 Call-back 초기화 다음, 혹은 BP의 Call-back 초기화 도중에 ViewModel을 할당할 수 있다.
ViewModel이 설정되지 않으면 새 Instance만 생성한다.
ViewModel은 PreConstruct와 Construct 사이에 생성된다.
Manual
코드 상 특정 위치에서 Instance를 생성하고 Widget에 할당하는 방식
Widget은 Reference를 가지지만, 할당되기 전까지는 Null 값을 갖는다.
Create Widget 노드에서 생성 시 ViewModel을 할당할 수도 있다.
ViewModel을 할당하면 Widget에 대한 Reference를 구하지 않고 UI를 Update 할 수 있다.
이 방법을 통해 UI가 하나의 Actor Class로부터 서로 다른 다수의 Widget에 동일한 ViewModel을 할당할 수 있게 된다.
Global Viewmodel Collection
MVVMSubsystem에서 Global로 Access 할 수 있는 ViewModel 목록
UCLASS(DisplayName="Viewmodel Engine Subsytem")
class MODELVIEWVIEWMODEL_API UMVVMSubsystem : public UEngineSubsystem
{
	GENERATED_BODY()

public:
	//~ Begin UEngineSubsystem interface
	virtual void Initialize(FSubsystemCollectionBase& Collection) override;
	virtual void Deinitialize() override;
	//~ End UEngineSubsystem interface

	UFUNCTION(BlueprintCallable, Category = "Viewmodel", meta = (DisplayName = "Get View From User Widget"))
	UMVVMView* K2_GetViewFromUserWidget(const UUserWidget* UserWidget) const;

	static UMVVMView* GetViewFromUserWidget(const UUserWidget* UserWidget);

	UFUNCTION(BlueprintCallable, Category = "Viewmodel")
	bool DoesWidgetTreeContainedWidget(const UWidgetTree* WidgetTree, const UWidget* ViewWidget) const;

	/** @return The list of all the AvailableBindings that are available for the Class. */
	UFUNCTION(BlueprintCallable, Category = "Viewmodel", meta = (DisplayName = "Get Available Bindings"))
	TArray<FMVVMAvailableBinding> K2_GetAvailableBindings(const UClass* Class, const UClass* Accessor) const;

	static TArray<FMVVMAvailableBinding> GetAvailableBindings(const UClass* Class, const UClass* Accessor);

	/**
	 * @return The list of all the AvailableBindings that are available from the SriptStuct.
	 * @note When FMVVMAvailableBinding::HasNotify is false, a notification can still be triggered by the owner of the struct. The struct changed but which property of the struct changed is unknown.
	 */
	static TArray<FMVVMAvailableBinding> GetAvailableBindingsForStruct(const UScriptStruct* Struct);

	static TArray<FMVVMAvailableBinding> GetAvailableBindingsForEvent(const UClass* Class, const UClass* Accessor);

	/** @return The AvailableBinding from a BindingName. */
	UFUNCTION(BlueprintCallable, Category = "Viewmodel", meta = (DisplayName = "Get Available Binding"))
	FMVVMAvailableBinding K2_GetAvailableBinding(const UClass* Class, FMVVMBindingName BindingName, const UClass* Accessor) const;

	static FMVVMAvailableBinding GetAvailableBinding(const UClass* Class, FMVVMBindingName BindingName, const UClass* Accessor);

	/** @return The AvailableBinding from a field. */
	static FMVVMAvailableBinding GetAvailableBindingForField(UE::MVVM::FMVVMConstFieldVariant Variant, const UClass* Accessor);

	static FMVVMAvailableBinding GetAvailableBindingForEvent(UE::MVVM::FMVVMConstFieldVariant FieldVariant, const UClass* Accessor);

	static FMVVMAvailableBinding GetAvailableBindingForEvent(const UClass* Class, FMVVMBindingName BindingName, const UClass* Accessor);
};
이 설정을 해주면 기존 Property를 Widget의 Parameter에 Binding하는 옵션이 제거된다.
Plugin -> Model View ViewModel -> Allow Binding from Detail View를 비활성화 하면 ViewModel에 대한 Detail 패널 Binding도 비활성화 할 수 있다.
이 설정을 쓰더라도 View Binding Menu를 통해 여전히 Bind를 할 수 있다.
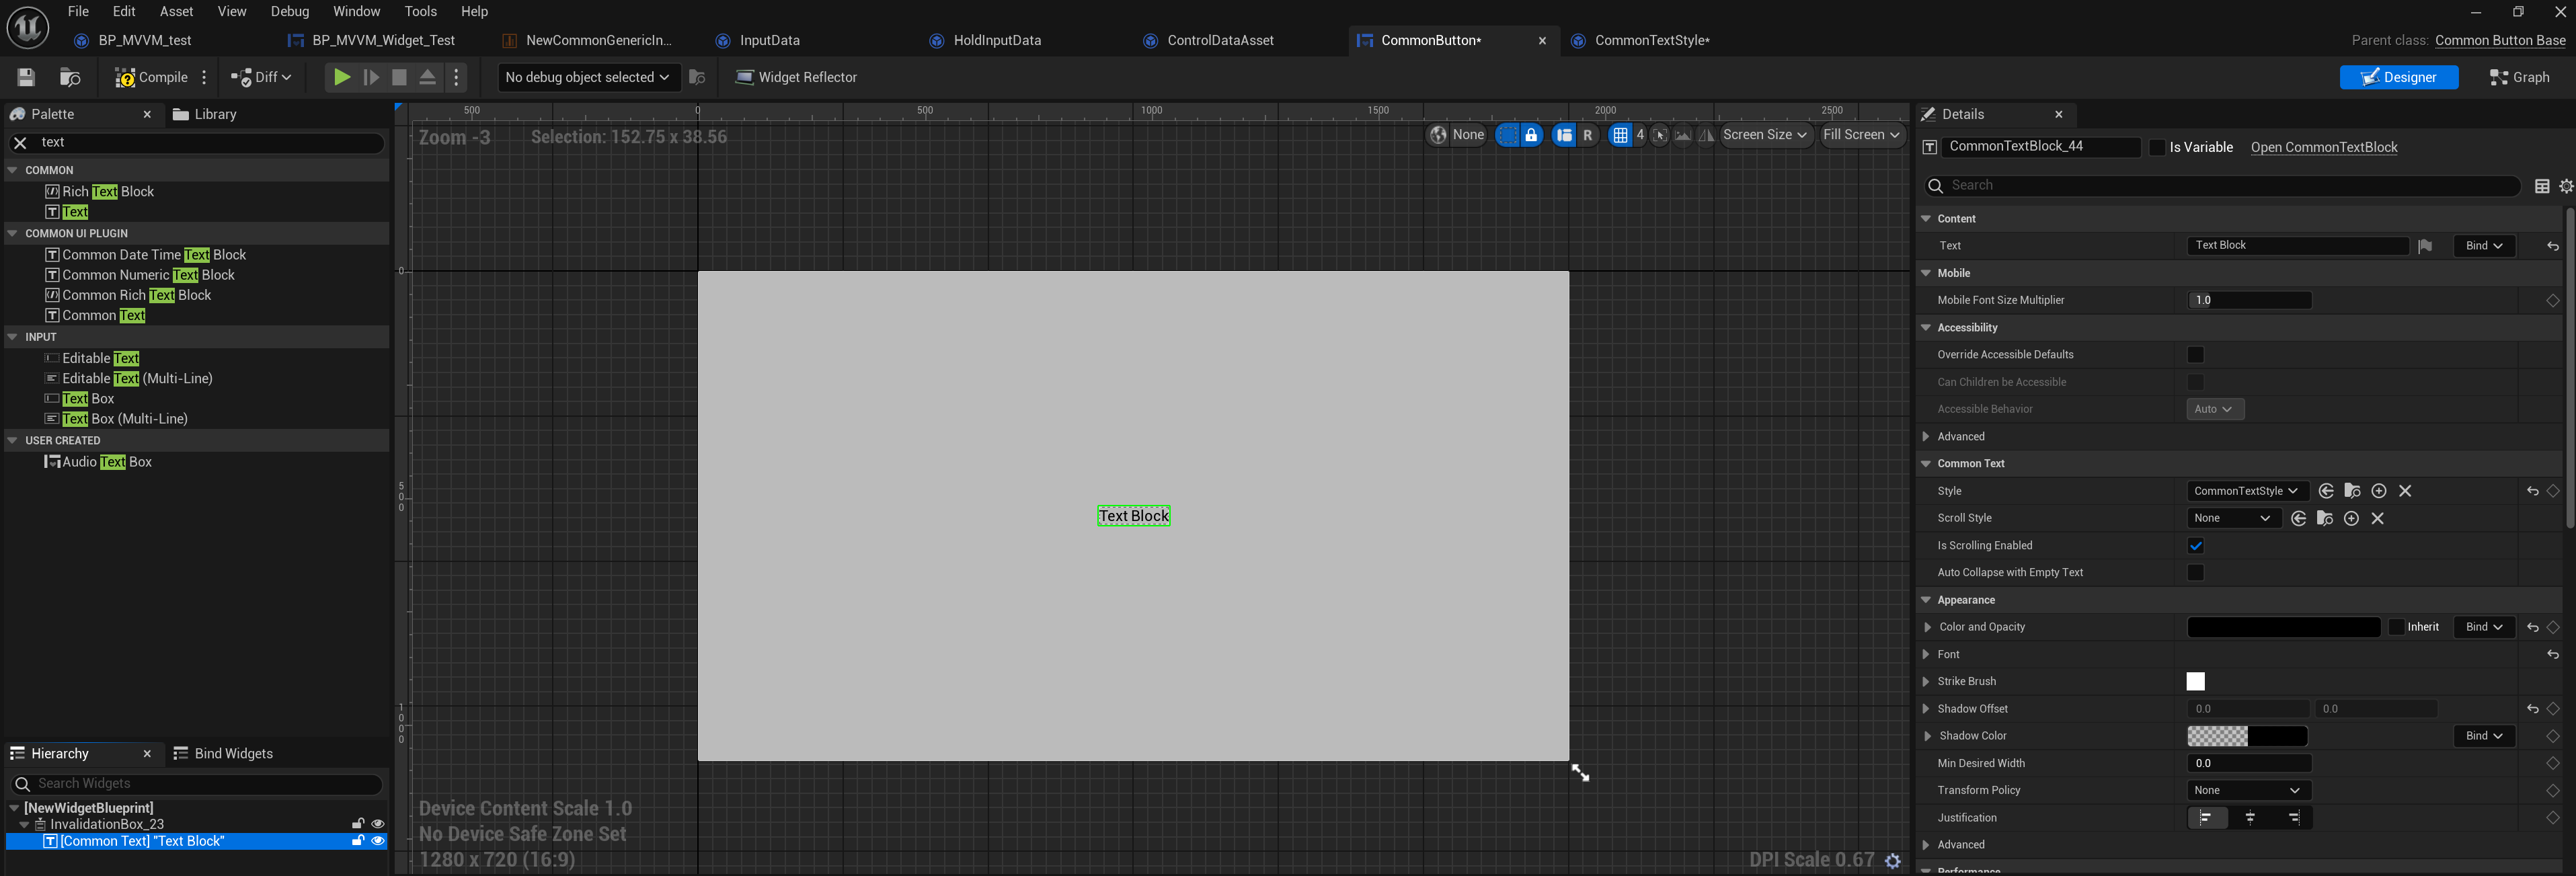
View Binding Menu
UMG Designer -> Window -> View Binding 선택
Add Widget을 통해 View Binding 목록에 추가하고 Bind 진행
Configure
Select Target Widget
View Binding을 추가 할 Widget 선택
Create View Binding Entry
Target Widget 하위에 있는 개별 Property마다 별도의 Bind를 걸 수 있다.
물론 하나의 Property에 여러 Bind를 걸 수도 있다.
Select Widget Property
Target Widget의 변수 및 함수 목록이 표시된다.
이 항목에는 C++로 정의된 UFUNCTION(), UPROPERTY()도 포함된다.
BP에서 정의한 변수나 함수는 자동으로 사용 가능하다.
Select ViewModel Property
Target ViewModel과 Target Property를 선택한다.
Set Bind Direction
Bind Direction을 선택해 Widget과 ViewModel간의 정보가 흐르는 방식을 결정한다.
기본적으로 모든 ViewModel은 PreConstruct와 Construct 사이에 한 번 실행된다.
Bind Direction이 Two Way인 경우에는 One Way Bind만 실행된다.
ViewModel 값이 SetViewModel을 이용해 변경되면 모든 Bind가 실행된다.
Set Execution Mode
Bind 된 Widget 등의 실행 방식을 지정
UENUM()
enum class EMVVMExecutionMode : uint8
{
	/** Execute the binding as soon as the source value changes. */
	Immediate = 0,
	/** Execute the binding at the end of the frame before drawing when the source value changes. */
	Delayed = 1,
	/** Always execute the binding at the end of the frame. */
	Tick = 2,
	/** When the binding can be triggered from multiple fields, use Delayed. Else, uses Immediate. */
	DelayedWhenSharedElseImmediate = 3 UMETA(DisplayName="Auto"),
};
Use Conversion Function
변수에 대한 직접 Bind 대신 Conversion Function을 채택할 수 있다.
Conversion Function은 ViewModel의 변수를 다른 타입의 Data로 Convert하기 위한 Interface를 제공한다.
Convert 함수를 선택하면 설정할 수 있는 창이 드롭다운 아래 나타난다.
만약 이미 드롭다운 데이터가 있다면 이 기능이 비정상 동작한다.
이 때에는 Clear를 해서 한번 날려주고 하면 잘 된다.
새로운 Conversion Function은 Global 단위 혹은 UserWIdget에 추가될 수 있다.
단, 이 함수는 Event, Network, Deprecated, EditorOnly로 선언되면 안된다.
BP에 표시되어야 하고, 하나의 Parameter와 하나의 Return Value를 가지고 있어야 한다.
Global로 정의되는 경우에는 static으로 선언되어야 한다.
UserWidget에서 정의되는 경우에는 pure 및 const여야 한다.
ViewModel 작업 팁
거대한 하나의 ViewModel 대신 작고 간결한 ViewModel을 권장한다.
이는 UI 디버깅을 하기 훨씬 용이하다.
예를 들어 Ability,Inventory 등으로 구성된 Array를 사용해 RPG에서 Character를 나타내는 ViewModel을 상상하자.
이 ViewModel에 Bind 된 Widget 중 일부를 디버깅 하기 위해서는 전체 Character를 Spawn해 ViewModel의 데이터를 채워줘야 한다.
이 때, 서로 다른 Component로 분할하면 Debug 할 때 Test Data로 더 쉽게 채울 수 있다.
또한 ViewModel은 다른 ViewModel 내부에 중첩하면, 복잡한 데이터 작업에서 유연성을 높일 수 있다.
예를 들어, HP ViewModel과 Attribute ViewModel을 각각 생성하고 이를 Character ViewModel에 중첩할 수 있다.
이 경우, Test에서 개별 Widget은 각자 연관 된 ViewModel에서 Data를 취할 수 있다.